
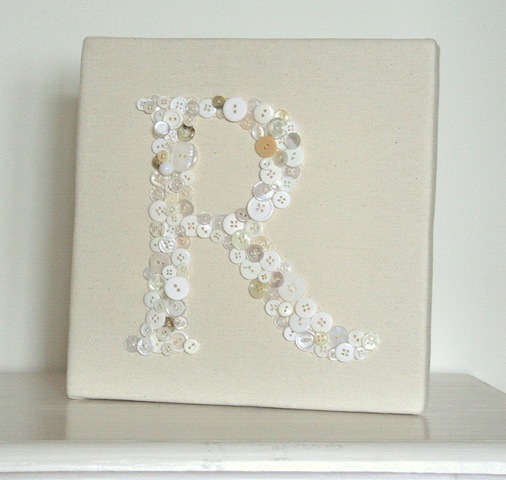
This weekend a good friend of mine got married. Being a poor creative student I decided to make a gift rather than buying one. The picture above was inspired by this image that I'd found on another site a few weeks ago (if I find which site it was I'll update the link to go to that site).
Step 1: Choose a Picture Frame
It all came together when I discovered that the picture frame to the left had fallen off my wall and the glass had broken. Trying to replace glass in picture frames isn't worth my time so I thought this would make a perfect frame for the button monogram idea.

Step 2: Paint the Frame (if you so choose) Since the faux-wood look was kinda chipped and out-dated I scrounged around in the garage for some paint and came up with some chrome spray paint. My original idea was to paint it white and then paint gold over it, maybe sanding some away. However, spray paint was quicker so I did one light coat of the chrome and let it dry for about 1hr. Then I took some gold craft paint and lightly brushed it on, one coat over the entire frame so that some of the chrome(sliver) still shows through.

Step 3: Monogram Font
Trace the outline of the frame on your fabric. Next, decide what font you would like your monogram to be and print off the letter in a size that will fit your frame. If your fabric that you are putting the buttons on is thin enough you might be able to just put the print-out behind the fabric and trace the letter onto the fabric. Otherwise, you can cut out the letter and trace around it.


Step 4: Choose and Attach Buttons
I really liked the neutral palate of the monogram I found and because I didn't know the decorating scheme of the couple I was going to give it to I decided on mostly neutral buttons. I first laid out the buttons and then decided to add a few pink and blue buttons since those were the wedding colors. I then attached them using a hot-glue-gun one-by-one.
Step 5: Trim Edge
Trim the excess fabric around the edge of the monogram. 

Step 5: Make sure fabric will fit in frame
Since my frame screwed together I had to trim off a bit on the edges for the screws.

Step 6: Assemble
Sandwich the fabric and frame and assemble! You're finished!

Variations: Use an un-framed canvas like in the photo I'd first found. Use a variety of colored buttons. Use a specific color scheme like red/white/blue for example. Add the "est. 2011" like I did above with permanent marker.
Linked up to:
Market Yourself Mondays
Party Time
Mad Skills Party
Making the World Cuter Monday
Amaze Me Monday
Show Me What Ya Got
Wow Me Wednesday
Inspired By You Wednesday

Party Time
Mad Skills Party
Making the World Cuter Monday
Amaze Me Monday
Show Me What Ya Got
Wow Me Wednesday
Inspired By You Wednesday

Super cute idea:) What a fun gift!
ReplyDeleteVery pretty!! Love the look! I am visiting from The Girl Creative and I am a new follower! Hope you have a great day and I look forward to seeing you around soon!
ReplyDeleteMichelle
www.delicateconstruction.blogspot.com
Very creative, Lisa! I'm lovin' stuff with buttons lately!
ReplyDelete