Showing posts with label sew. Show all posts

Thursday, March 8, 2012

Horse Head Pillows

This past Christmas I participated in my 1st office Christmas party and secret-Santa gift exchange.  The co-worker who's name I drew really likes horses and on the sheet of ideas we passed around she requested a new saddle :/ Well, they cost a-lot of money this college student doesn't have so I was able to come up with these pillows which I think she liked!

These are the basic steps:
Cut a square piece of fabric for the front of the pillow (sorry I don't have a pic of this!)

Cut two pieces of fabric for the back of the pillow.  Cut these pieces the same width as the front but just a bit shorter than the front square so that you have two rectangles of the same size that are slightly shorter than the front square. (sorry I don't have a pic of this either!)

Finish one edge of each of the back rectangles.  I did this by zig-zagging the edge and then folding it over and stitching along the edge.  

I cut two horse-head shapes out of fabric using my Silhouette machine.  You could also print out a shape and trace it on to your fabric and cut it out that way if you do not have a cutting machine.  Because I was making two pillows I flipped the image for one so that the heads would be facing each other.  


Stitch close to the edges of the shape to hold down.  I did have fusible interfacing on the back of mine as well but I felt safer also stitching the edges down.

With right-sides together match one back rectangle up with the top of your pillow.  Pin along the top and sides.

Layer the other back rectangle on next, finished edge toward the middle and matching the bottom and side edges with the edges of the front square. 

Sew along all outside edges.  This creates the pocket/envelope pillow cover.

Turn right-side out and insert pillow form! You're done!


Stay tuned for the Giveaway revealed coming on Saturday!


Linking Up Here!

Wednesday, February 29, 2012

Wonderful Wednesday


Well it's Feburary 29th...an extra day of work...but also an extra day to craft!  Here are some crafts and projects I noticed this week while browsing the link parties.  They are all projects I'd love to use this extra day to work on this year!
Pet Silhouettes by Kirsten from Paint Speckled Pawprints
by Amy at Life's Jewelry Box

A Light Fixture Combination Re-do by Peter at Life at Lower Mountain

So head on over and check these blogs out! From crafting to baking to home up-dating this week's Wonderful Wednesday has something for everyone!

Those who were featured can pick up their "featured button" on this page.


Linking Up Here!

Saturday, October 29, 2011

Cowl-Neck Tee

This week I made a resolution to start using up the clothing items in my "alter-me and I will be beautiful" clothing pile.  This pile has grown to about 4 skirts, 5 tops, and various other pieces of clothing.  It may not seem like alot but being that I am working out of my bedroom for alterations and this pile is taking up my floor space.

So as an effort I went scrounging for some tutorials/ideas to alter some tees that I had stuck in the pile because I really never wear them as a result of the wide/lowcut neckline.  Well as I was stalking pursuing Katy's awesome blog: Sweet Verbena  (if you haven't checked it out, well, you should!...like right now) I discovered this tutorial:
(click the pic)

(among the other really neat tutorials she has...scroll to the bottom for a list of some of my favorites)

and then I thought "hmmm....that cowl neck adds extra fabric around the neck region...I'll bet that it would work just splended on those shirts I have at home!"

Monday, October 24, 2011

Shoulder/Crossbody Purse

My favorite style of purse right now is the Shoulder/Crossbody Purse as when I wear it cross-body my hands are freer to (browse the sale racks) hehe... see it's a very useful design.

Using the pattern I featured in a giveaway post here, you can also see an example of another one I've created for a giveaway here, I've created some more versions by altering the pattern a bit.

Saturday, October 22, 2011

The Hand-Bag

If ya don't mind I'd like to show some projects I've been working on lately! 

Remember that bag I made for the hand-made gift exchange?


Well, I decided to try my hand at a few more with some different fabrics.  
The 2 bags below are what I came up with.

Friday, October 21, 2011

Pleather Techniques

Recently I found a great resource for working with pleather.  I love the look that this leather-like material has for finishing purses and accessories, however it can be a bit difficult to work with.  


 The above tutorial wasn't out when I sewed this bag so I sorta just made it up as I went along and ended up just zig-zaging(?) the edges of the hole that the strap goes through since I could not get my pleather to look like it does in the pictures over at her tutorial.  I also did the button hole on the front of the strap so that the end of the strap wasn't showing on the outside.  Because my strap wasn't as wide I also only did one button hole. Although next time I'm going to try the tutorial way!

Thursday, August 11, 2011

Tote Tuesday Part 3: Finale!

hello hello. I just realized that this tutorial series stretched out into alike 4 posts total!  I am astonished that I stretched it out that long and I promise that I will NEVER stretch a single project out into more than 2 posts EVER AGAIN.  I realize that I would probably not have enough attention span or dedication to come back and see what to do next so I wont ask you all to either from now on.
Now to the finishing the tote...hope some are still with me :)

MATERIALS:
  • the assembled tote body (outside)
  • the lining you've worked on so far
  • fabric for handles
    • if you are copying the handles I did you will need 2 contrasting fabrics)
STEP 1:
Sew lining sides and form bottom

  • Fold lining right sides together.

  • Sew together each side.
  • Pinch the bottom corners and sew across like you did when assembling the tote body here.


STEP 2:

Wednesday, August 10, 2011

Tote Tuesday Part 2: Zippered Pocket

I include 2 different types of pockets in the totes I make.  I like to include a zippered pocket for all those things I don't want to fall out, but I also include a basic open pocket for the things I want to be able to grab quickly: a chapstick, pencil, etc.

SUPPLIES:

  • Tote lining
  • Fabric for pocket: less than a fat quarter
STEP 1: 
Cut Fabric
  • 1-28"x18"piece of fabric you are using for lining
    • note that the piece of fabric for the lining is the same dimensions as the fabric cut for the tote body, therefore if you are making a tote of different dimensions you just have to make sure the lining and tote body are the same size
  • 1-10"x18" piece of fabric for basic pocket
    • again, if you would like a larger, smaller, skinnier, fatter pocket you can adjust accordingly by determining how wide you would like the pocket (plus 2 inches for seam allowance and zipper placement), and how tall you would like the pocket (when figuring the height, multiply it by 2, because you will be folding the pocket over, and then add 1 inch for a seam allowance
  • 1-8" zipper

STEP 2:
Mark zipper placement.
  • Fold fabric for pocket right-sides together, hamburger bun style.
  • About an inch under the top fold of the pocket is where the zipper will be placed, draw a rectangle about 7 1/2" long by 3/8" wide. As shown in pictures.


    STEP 3:

    Tuesday, August 9, 2011

    Tote Tuesday Part 2: Lining

    There are a few different techniques involved and I want to include many pictures with each one, in an effort to streamline things I'm going to split the lining up into a few different posts so I can include lots of pictures and still keep the posts to a manageable length.  All of the tutorials that make up the lining will be released within hours of each other (you wont have to wait a whole week for the next part :)

    Below are links to the posts that make up the whole of the lining:

    Basic pocket
    Zippered pocket
    Assembling lining


    Tote Tuesday Part 2: Basic Pocket

    I include 2 different types of pockets in the totes I make.  I like to include a zippered pocket for all those things I don't want to fall out, but I also include a basic open pocket for the things I want to be able to grab quickly: a chapstick, pencil, etc.

    SUPPLIES:

    • Tote lining
    • Fabric for pocket: less than a fat quarter
    STEP 1: 
    Cut Fabric
    • 1-28"x18"piece of fabric for lining
      • note that the piece of fabric for the lining is the same dimensions as the fabric cut for the tote body, therefore if you are making a tote of different dimensions you just have to make sure the lining and tote body are the same size

    • 1-10"x18" piece of fabric for basic pocket
      • again, if you would like a larger, smaller, skinnier, fatter pocket you can adjust accordingly by determining how wide you would like the pocket (plus 1 inch for seam allowance), and how tall you would like the pocket (when figuring the height, multiply it by 2, because you will be folding the pocket over, and then add 1 inch for a seam allowance)

    STEP 2:

    Tuesday, August 2, 2011

    Tote Tuesday Part 1: Outside Body

    Here it is: Part 1 of the Tote Tuesday Tutorial series!
    This tutorial is how to make the basic body of the tote.  Measurements I list here can be modified if you would like a tote that is wider or deeper.

    Materials:

    • 1/2 yard of fabric you would like to use for outside                                                                         (heavier weight fabric will make a sturdier bag but will be more difficult to sew through, if you use regular weight cotton fabric, like I did here see note under interfacing)
    • 1/2 yard of interfacing                                                                                                                       (if you use a regular cotton weight fabric for outside consider using a heavier interfacing than if you are using decorator weight fabric)
    • 12"x18" piece of accent fabric along tote bottom                                                                                  (here I use a piece of faux-leather, you could also use canvas, denim, etc. the thicker/heavier the fabric the more rigid the bottom shape of the bag will be)

    Tuesday, July 26, 2011

    Tote Tuesday

    It's actually been a few weeks since I made this tote but I've been putting off posting it because I wanted to release a basic tote tutorial first and then release this one when I continue the series to show how you can customize the concept.  I am planning on next Tote Tuesday's project being the first post of the Basic Tote Tutorial Series so you can consider this one a preview!
    Make sure to add the blog to your follow list so that the series will show up on your dashboard reading list!

    The basic tote tutorial will consist of a series of techniques that you can mix and match.

    Techniques presented in the series will include:

    Tuesday, July 19, 2011

    Dress Conversion

    There have been quite a few postings out there lately channeling Shabby Apple's sort of T-shirt/Skirt/Dress style which looks extremely comfortable and wearable.  I've gotten bit by the bug and decided to try my hand at it. This is how we turned out!

    The top is a t-shirt I had gotten quite a while ago from Gap.  I love their t-shirts because thy are nice and long since I have a long torso to cover but I really don't wear blue shirts all that much since I just think it's kinda monochromatic when I wear blue jeans most of the time...seriously I think I have maybe 1 other blue shirt...

    Wednesday, July 6, 2011

    A 2 dress week

    This week was a two-dress week.

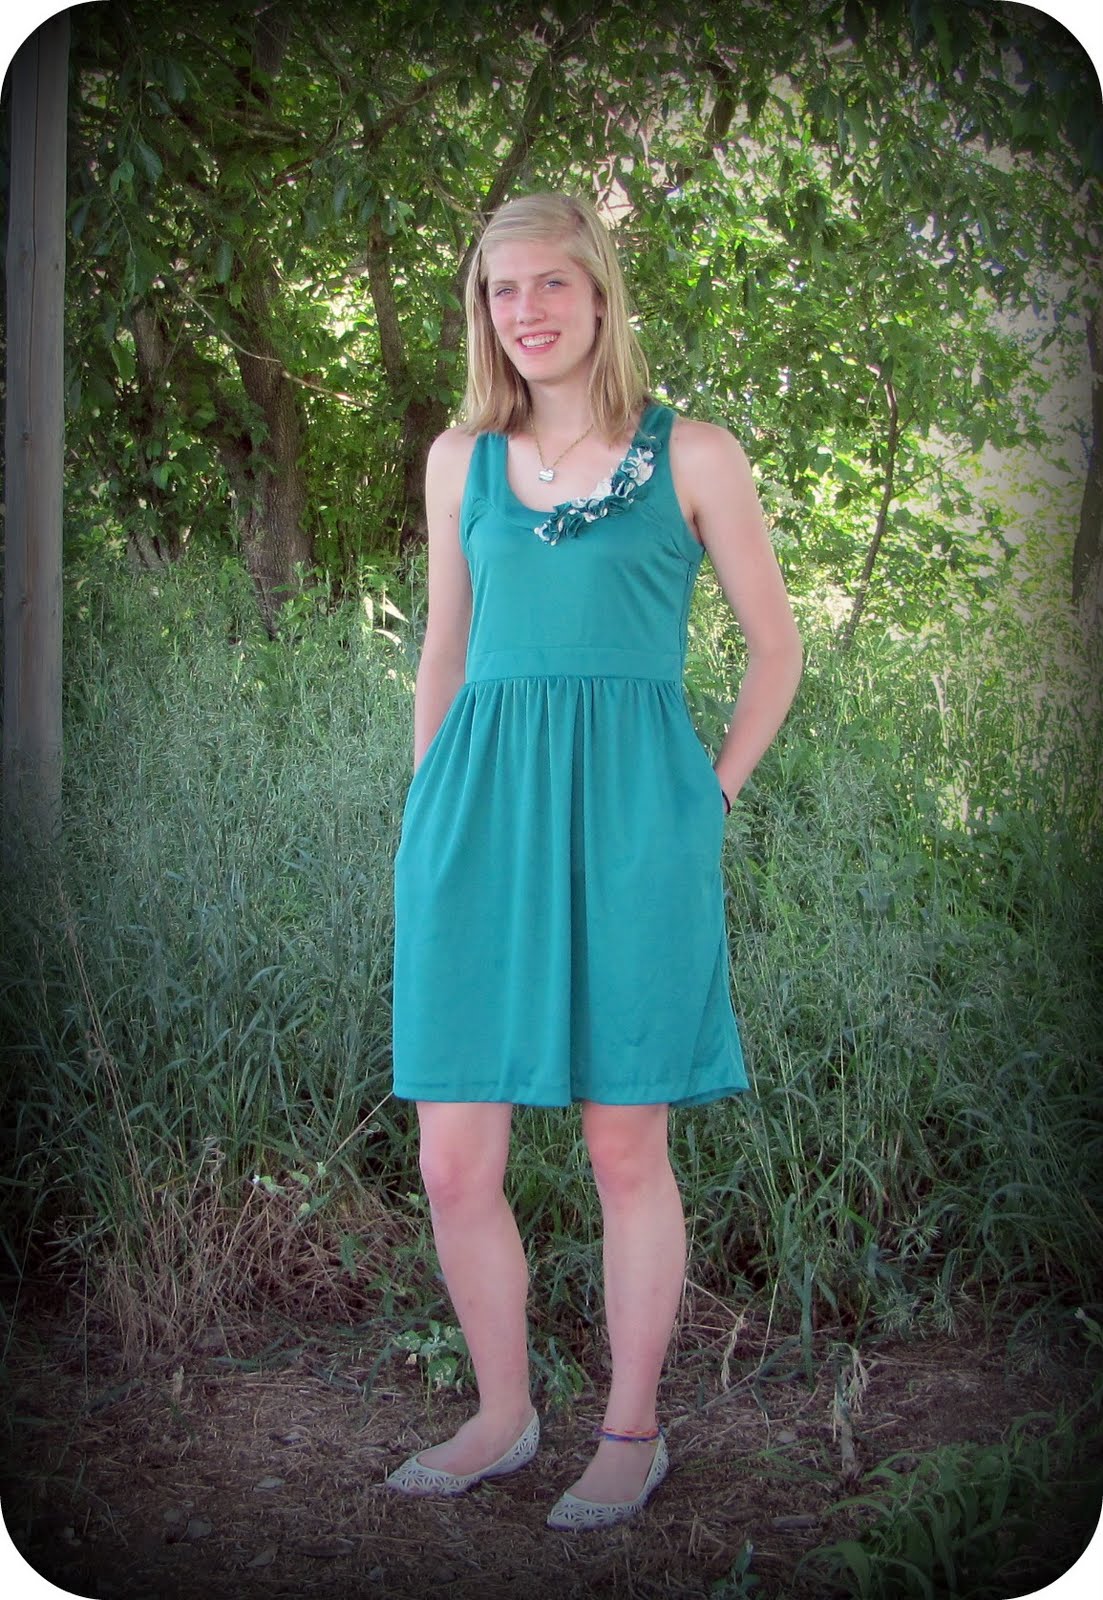
    In the previous post I mentioned that my first project on my machine was a green dress.  Well here it is modeled by my lovely sister Emily!
    This dress is made from Simplicity Pattern 4462.  I added the flower embellishments along the neckline using some of the same fabric the dress was made from along with some ivory lace.

    Then because I hadn't had enough of this pattern (and because it fits really nicely; perfectly hiding the racer-back undergarment styles!) I decided to make another dress from this pattern.  I used two different fabrics this time with a satin floral print for the skirt and a brown knit for the top again.  The second time around I was able to construct the dress (from cutting to hemming) in about 4 hours.  Anything I am able to finish in 1 day is appreciated and ups the chance I'll make it again in the future.

    Here it is!
    The only problems that I ran into during the construction

    Sunday, June 19, 2011

    Pillow Talk

    Hello!
    It's been a few weeks since I started this blog and subsequently posted anything...:( In that time I've started a new job, started up grad classes again, saw the last sibling graduate from highschool, and became one year older myself. Whew! Alot has happened! Oh, and I also celebrated the bachelorette party of one of my friends which brings us to today's post...
     Being the busy, crafty, cheap, thrifty gal that I am I wondered if I might find some inspiration to make something instead of buying an item. I thought that it might be unique as well and have a bit more meaning. Well I have a bucket load of crafting ideas saved in my bookmarks so I hit those up for inspiration and found some at

    www.flamingotoes.com/2011/01/he-loves-me-valentines-shirt/

    www.midwesternsewinggirl.blogspot.com/2011/04/ruffle-pillow-tutorialand-giveaway.html

    and

    www.homestitched.blogspot.com/2011/02/love-struck-pillows.html
      (sorry haven't quite figured out the "link up" to thing yet, you can copy and paste the url, or on chrome you can highlight, right-click, and then select "go to" and it will open up the link in another tab)

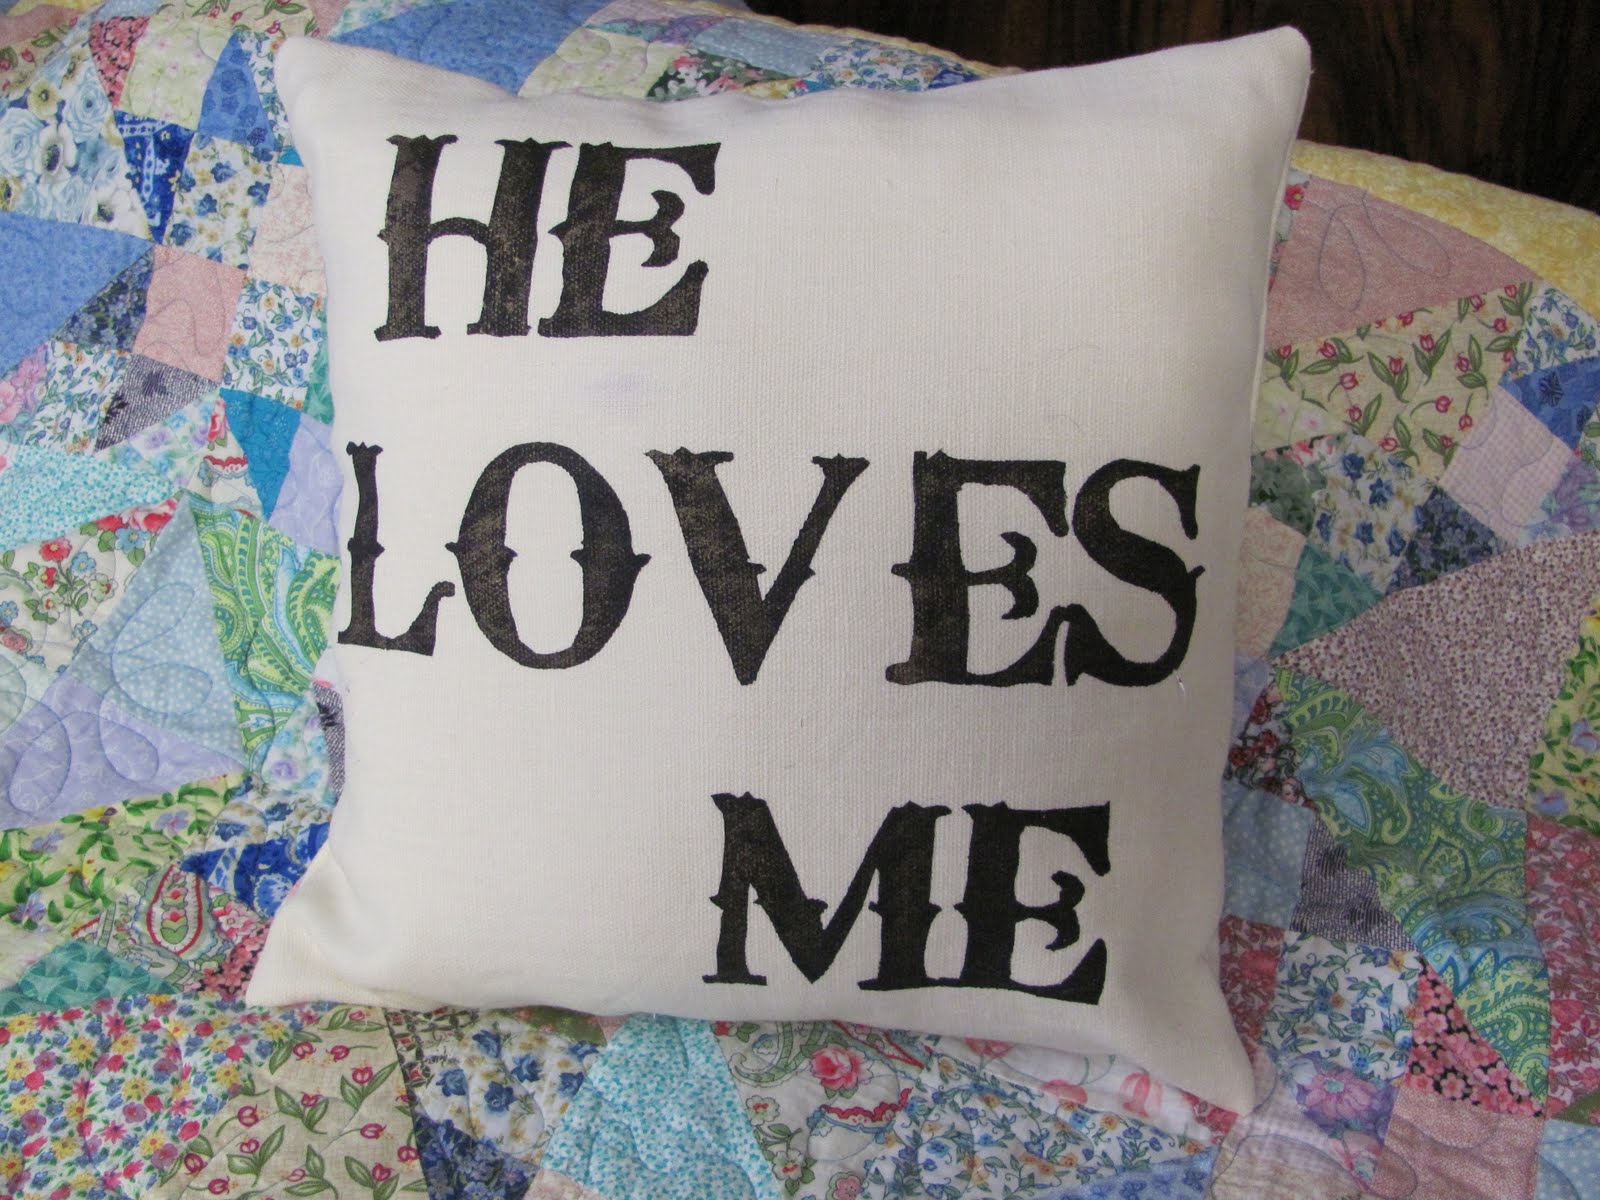
    Combining the saying of the t-shirt, with the fabric printing technique of the third site I came up with this:


    Related Posts Plugin for WordPress, Blogger...